Tracki GPS - Quick Start Guide

This is a short Quick Start Guide. The full manual including Product Safety is available on Tracki.com/manual
Also the following languages are available on Tracki.com/manual:
EN User manual | ES Manual de uso | FR Manuel en Francais | RU Руководство по использованию | JP ユーザー マニュアル | DE Deutsches Handbuch | CN 中文手册 | PT Manual portugues
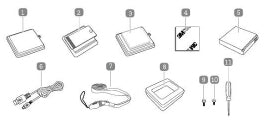
Package Includes:
- Plain battery cover
- Battery cover with clip
- Battery cover with magnet
- Adhesive Velcro
- Battery 600mAh
- USB Charging Cable
- Lanyard, can also use as keychain
- Water Resistant Silicon cover
- Long screws for clip cover
- Short screws for magnetic cover
- Mini Screwdriver
Charging Battery
The battery may be installed but not fully charged when you first unbox your tracker. To remove the battery back cover, gently place both thumbs on the middle of the cover and slide off, if the battery is not already inside insert the battery. Slide the cover back on, do not try to snap it in or out, only slide.
To charge, connect micro USB end of the cable to the charging port at the side of the tracker and the other end to a USB wall charger or computer USB port. When charging, the red light blinks. In order to get maximum battery and ensure deep charge, you will need to charge continuously for 8 hours.
Turning on your device for the first time
The device usually turns itself on when connected directly to power. So first, check if the device has already turned on: just briefly click any of the buttons and see if any light comes on. If no light comes on, the device is off. In that case, turn it on by pressing and holding down the small silver square on/off button for at least 5 seconds. You will see that the light turns on for a moment and then goes off - now the device is on. The green light on the front of the device should flash for a few seconds. Now you are ready to activate your device.
Signing up, creating your account and activating your device
Download the Tracki GPS smartphone Android or iOS app. See videos on how to get started https://tracki.com/setup
Activate by scanning the QR code located on the box sticker (or under the battery) and follow the prompted steps...
Or
if you don't know how to scan QR with your phone follow steps below:
- Activate your account on https://app.tracki.com click "Sign Up" & enter your info.
- We will email you a confirmation, go to your email and click the link. Check SPAM or "other" folder too.
- Once you log back into the account you have created, go to "add device"
- Enter the device ID and last 4 IMEI located on the box sticker (also under the tracker battery).
- Make sure your GPS tracker is on, wait for a minute, the system will try to connect to the device.
- If you can't get the device location on the app, press the SOS key for 5 seconds.
- If you get an inaccurate location, take it outside to be exposed to the open sky to receive the initial GPS position.
if you get a message that the device is not connected or responding, wait a couple of minutes and try again.
Setting up tracking intervals - Important!
To activate the actual tracking please make sure to update your device settings tab, to set how often the device will store your tracking history. By default, it is set to "0" this means it will not record locations. A tracking trail can be viewed in your history tab. Please keep in mind the longer the tracking time interval the longer your battery will last.
Important! Understanding GPS signals and reception
If your tracker doesn't make a connection to the GPS Network you may need to reposition the device. Avoiding obstructions that could be blocking the signal can greatly improve the accuracy and battery life of the tracker. Enclosing the device in materials such as metal or thick concrete will block the trackers ability to receive the GPS Signal. If the GPS connection becomes blocked or is unavailable, the device will approximate its location using the closest GSM cellular towers. A GSM connection provides less accurate results, ranging from hundreds of feet to a few miles away. If a Wi-Fi router is available nearby, it too will approximate the trackers location by detecting the source of the WIFI connections being used.
Tracki device lights and sounds
About the features
Alerts:
SOS alert - You will receive a notification when the SOS panic button is pressed.
Speed alert - You will receive a notification when the tracker moves faster than the speed pre-defined by you.
Low battery alert - You will receive a notification when battery level is low.
Movement alert - You will receive a notification when the tracker starts to move.
Geofencing crossing alert - You will receive a notification when the tracker enters or exits Geofencing.
Who receives the alerts? - The alert always sends an email message to the email of your account, and if you entered a phone number when you activated the device, it will also be sent via SMS to that number.
You can easily add more people who will receive the SOS alert. This is how to set it: On the smartphone App or web App you click on "Settings" and you will see a list of all the possible alerts that the device can trigger. For each alert, you will see a link "add contact to this alert". You click this and enter as many contacts as you wish (emails or phone numbers). You will also see contacts that you have entered before, and you can check them on or off if you want them to receive some of the alerts and not others.
How to use the SOS button
Press the button with the red SOS letters and hold it down for at least 3 seconds, you will then see 2 blue lights blinking and will hear a beep (unless beep is set to off on the app). The SOS button is used to alert as many people as you need of distress. This will cause the SOS alert to be sent, with the exact location of where it was pressed.
The other 2 left and right buttons can be used for other types of pre-agreed upon messages sent by the device holder. For example: I arrived at school, I was just picked up from school, I sent false SOS etc.
Geofencing
The Tracki device can alert you if it crosses the boundaries of a certain area that you set up on the map, like your house, street or neighborhood. This area is called a Geo Fence, or a Virtual Fence, or "fence" for short.
You set up a fence by clicking the "fences" link on the website app or Smartphone app, just below the "settings" links, and click "create a new fence". The fence will appear on the map as a rectangle at the center, and you can change its size and position by grabbing its corners and dragging them where you want. You can also set the center of the fence by entering an address in the address search box. Then you give your fence a name and save it. After you save the fence, every time the device crosses the fence's boundaries, you will receive an alert. You can add more contacts who will receive the alert too by email or SMS.
Important to know about fences: the GPS sensor sometimes receives signal interference, which causes it to shift momentarily for several 10's of meters, and it quickly corrects the location. However, if the fence boundary is too close to the device's usual location, the interference might cause it to momentarily appear as if it crossed the fence and create a false alarm. If you set the fence exactly at the location of your backyard, and your dog hangs around near the yard's edge, you might get a false fence alert. We recommend setting the fence to no less than 200 meters (about 200 yards) on each side, and in any case keep a bit of space between your yard's boundary and the virtual fence.
History reports
You can generate history, trip and alert reports for any of your devices that have tracking intervals enabled. Simply go to History Replay and you have an option to select a device, a date range and which type of report you want to Generate or download.
History Report will show you the points on the map where your device was while it was moving. Trip Report will show you the trips based on a single journey to help sort your history data. The device will not report its location when it's not moving, it will resume tracking only when it detects movement.
Battery life
Rechargeable battery life is about 2-3 days tracking real time every 1-5 minutes. If you don't need real-time tracking and want the battery to last 30 days, use the sleep/hibernation mode on the app which will track 3x times per day. In order to maximize battery life avoid fences or speed alerts if you don't need them.
Optional waterproof magnetic box with 6x stronger battery extends battery life to 2 weeks at 1-5 min update & 6 months tracking 2-4 times/day. Find it on Tracki.com or Amazon: amzn.to/2TEX4MW
Safety Warning
Read all the details on Tracki.com/manual
Electric shock hazard: Only connect the device to a USB outlet, be careful when you use a wall charger as you plug into wall outlet.
Explosion and fire hazard: Do not tamper, puncture, alter, overheat or charge battery by any other than Tracki made products.
Acid burn hazard: Damaged battery can leak and cause burns to skin. Do not tamper & protect the battery from mechanical damage.
Choking hazard: This product contains small parts that could pose a choking hazard if swallowed, keep all parts away from your child.
Need Help?
If you are not completely satisfied with your order, please call: +1 323 785-2020 (M-F 8AM-5PM PST) so we may address your concerns immediately. We promise we will go the extra mile and do whatever it takes to ensure you are satisfied.